

Managing Shopify Metafields
You can manage Shopify metafields within seconds and witness the change within few minutes. There are three easy ways to add the Shopify Search bar to your online store.
1. Expertrec Shopify Search bar
2. Expertrec Shopify Search Plugin
3. Expertrec custom search engine
Also, you can always add code and modify the default Search bar. Since it is harder for non-coders, we will talk about it in the later section. Let’s get started with the easiest way:

Manage Shopify search metafields using Expertrec smart search bar
Modify metafields with apps
Having a proper understanding of metafields will help a lot. But, we can already witness that adding metafields required a decent familiarity with Liquid. It means you need to be a developer somehow. Right? Not anymore. It is understandable that it is not a practical solution that everyone can use. That is where Shopify apps come into the viewport. The best thing about using an app is that it used to provide a Graphical User Interface. It simplifies the way you create and maintain metafields for your products.
Although metafields may appear like a top-secret feature that only a selected number of lucky developers can access, it is not that. You can start using it right from today. Here’s how you can modify metafields using the Expertrec smart search bar.
1. Expertrec Shopify Search App
Note: The Expertrec Shopify Search bar is listed on Shopify App Store.
1. Click on Expertrec Smart Search Bar to install the app.
2. After installation, please enable the search extension, and you are all set to use a modified search bar that really listens to you!
Now, Install the Expertrec Smart Search Bar by clicking on the install button. Now, click on Start Free Trial to access Shopify Search Bar. Make sure that Expertrec Smart Search Bar is enabled. Here you get Expertrec Smart Search Bar on your Shopify Store.
When you open the Expertrec Smart Search Bar, in the dashboard -> search settings -> weights, you can see the extracted meta. Here, you can change the weights and decide whether to show or hide the meta in the search. But, for more advanced cases like extracting more meta fields that are not already extracted, you can reach out to the Expertrec support team. They will do it from the backend. It is the easiest solution to edit and manage the Shopify metafields.

2. Expertrec Shopify Search Plugin
The second method is quite similar to the first one. I’m sure you will get the App installed through the first method already.
1. Click on Expertrec Shopify Search Plugin.
2. Enter the URL of your Shopify store in the Shop domain.
3. Click on the install button.
4. Log in to your Shopify Store and click on install.
5. Expertrec Search Plugin is installed.
6. Check the apps section to confirm that the Expertrec Search App is installed.
3. Expertrec Custom Search Engine
1. Firstly, log in to your Shopify store to access the admin panel.
2. Click on Online Store and select the Theme option. On the right-hand side, click on Actions. A drag-down menu will appear. Select Edit code option located at second top from bottom.
3. In the layout, click ontheme.liquidto add the code. You will see a section of code on the right-hand side.
4. Now Click on Expertrec Custom Search Engine to access the code. Log in with your Google Account and continue to add code to your Shopify store.
5. Copy the code and the tag. Copying both of them is a must.

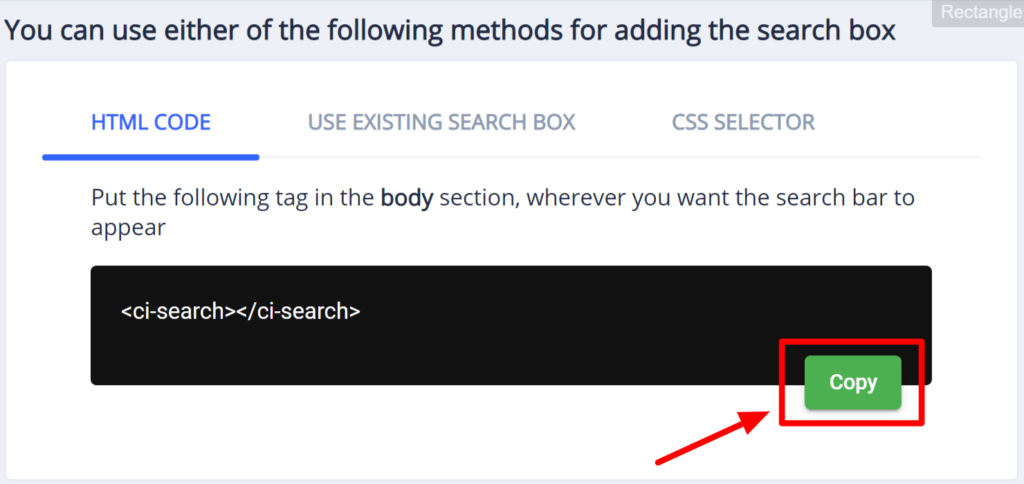
6. Paste the code in the <head> section as shown below. Make sure it just below the head section. Also, paste the HTML tag inside the <body> section in between the two <div>.
7. Save the code and you are all set to access the Expertrec Shopify Search bar in your store. You will get the Expertrec Search bar that is really fast. It successfully understands queries in 30+ languages. This makes it a search bar that understands the words of users. It supports autocomplete and recommend searches. It gives awesome search analytics, and yes, there are a lot more benefits. All you need is to install the Expertrec search bar. Integrating it with your Shopify store will help to launch your Shopify store to the next level.
FAQ
What is Shopify Search Metafield?
Metafields are additional data in each object of your storefront that tells extra information about the object. The common structure of a metafield consists of a namespace, a key, a value, and a description (it may be optional). The namespace helps in grouping several metafields forming a superset of selected metafields. The key acts as a label or an identifier to a specific metafield. The value inputs the actual value of the metafield. And, you can describe your metafield in the description that is usually an optional field.
Why should you use metafields?
Do you have a number of unique products on your Shopify store? Then, you may already know that creating multiple custom Liquid product templates for each product is very tough to manage efficiently. And, undoubtedly, there are many issues that will arise. Some of them are inconsistent code between the pages, facing bugs, and yeah, your precious hours will fly like small moments.
So, what can be a better option? How can you move ahead from all these potential issues and get a balanced solution? If you in search of it, then you land at the right place. So, we will use metafields to store all the unique product information instead of using custom Liquid templates. The best part of using metafields is that they can heavily help you to extend the functionality of your Shopify store. They give you the ability to store all the additional information on blogs, products, pages, orders, and collections. Note that by using Liquid, you can display that additional metafields info on your Shopify storefront.
How to edit metafields from the Shopify admin panel?
As you already know, metafields consist of three components. These are a namespace, a key, and a value. Once you recognize the namespace and the key for your metafield, you can easily display them in the bulk editor. Now, start making the changes to the URL of the bulk editing page in the Shopify admin panel.
Let’s say, you want to edit an ISBN metafield. So in the following URL, you need to edit the ISBN metafields on the bulk editing page of the Shopify admin panel.
https://shopify.com/admin/bulk?resource_name=Product&edit=metafields.global.isbn:string
Note this URL. As you can see, the namespace of the metafield is global and the key is isbn. The primary lesson is that you can always replace these values with values that match your version of the use case. The part URL that tells Shopify about which type of data you want to store in the metafield is no other than string .In the bulk editor, you can display five types of metafields. These are string, money ,boolean, select and number.
If you want to display more than one metafield in the bulk editing page of the admin panel, you can do it by separating the metafields using commas.
Metafields may appear full of complexities but once you understand the basics, they will save a lot of time, require lesser lines of code along with expanding the functionalities. You can become more efficient by using several techniques, tools, and yes, apps as it makes the task easier than ever. It’s pretty awesome that a single line of code can open new domains for your Shopify store.
What is the difference between Shopify tags and Shopify metafields?
Tags are the most common way to handle data against properties. It is stored and requested in form of values that are separated by commas. Tags are the core way that Shopify uses to manage data. They are supported by most third parties and apps listed on the Shopify app store. They are also available via various APIs and play a crucial role in most Shopify functions. We have different types of tags. Product tags, customer tags, and order tags (these work as the main form of the tag) help the users to filter the order and follow similar and extended functionalities.
In simpler terms, tags are very simple “objects”. But, what makes them stand out of the crowd is that they are highly versatile for their usage and scope within Shopify and third parties. Tags are used for storing very simple data and drive actions. They are a great way to categorize the data. But, the notable thing is that they are not as same as a “product attribute”. You cannot have varying input types, variable scopes, and they are not at all designed to store data or information. That is where metafields come to help.
A metafield is a custom field that can be assigned to products, orders, and customers. The best thing is that you can store data and actively control different actions using metafields. It is a more complex data form and you can request and manage it via APIs. You can use it for complex actions or whenever you need to store some information. For instance, you can store information that a third-party app may require similar to an additional image or say SEO data. You can set a number of pre-set options and give a choice out of it. You can add an additional text field on your product detail page. And, you can set options in order to add specific labels or images.
You can use apps to manage metafields. But there’s a downside of metafield and that’s the same reason why people still rely on tags over metafields. It is true that Shopify APIs can help in accessing both, the tags and metafields, issues tend to come from metafields that used to take a lot longer. That’s why, wherever things are done by using tags, people prefer it. In addition to this, all the third parties support tags but not all of them support metafields. Reasons are slower access and the critical impact on updating an index. That’s why even third parties and apps prefer tags over metafields.
How to manage Shopify metafields without using an app?
As discussed, the easiest way to manage Shopify metafields is by using an app. However, here is an in-depth guide for creating, updating, and deleting your Shopify metafields.
How to create metafields?
While using querystring to open the bulk editing page in the Shopify admin panel, you can see this URL:
https://myshop.shopify.com/admin/bulk?resource_name=Product&edit=metafields.global.isbn:string
You already know that myshop is the name of your shop. The content type is the product. The namespace is global with a metafield name as isbn and the data type is a string. So, the best possible way to edit the metadata is to play around with the strings. You’ll also need JavaScript to concatenate differentstring into the URL in order to generate new fields. Note that the metafield form is only one page so you will need to use JavaScript as inline at the bottom of that file.
Let’s structure your data
As this one, say, you have a series of FAQs about a particular product. So, you can structure your data like this:
faq (namespace)
q-one “Does Expertrec smart search bar has voice search?”
a-one “Yes, Expertrec smart search bar has voice search along with unlimited Ajax search, facets and filters, and search analytics.”
q-two “Is it true that Expertrec offers a 14-day free trial?”
a-two “Yes, Expertrec offers a trial for 14 days so that users can completely understand and witness the benefits of installing Expertrec smart search bar from Shopify app store.”
We are using letters instead of numbers. This is because you can also use numbers on the bulk editing screen but the issue is that the data you enter against that field will not be saved. That’s the prime reason why we are using letters. If you tried to add an already existing metafield then you will see that data once you reach bulk editor. The URL will be the same. You can hide the link for other users leaving the ones who have to work with the admin interface.
To add content for Shopify admin users in the layout/theme.liquid, see the following code:
{{ content_for_header }}It will generate a number of meta-tags and JS to be used within the <head> of your site that controls Shopify functionality. You can turn it into a string. It is global so it means it is not limited to theme.liquidonly. Since in most cases, you cannot change the variable values in liquid, we assign a temporary variable to admin check snippet value. You can use it as follows:
{% if admin == 'true' %}
  <p>
    <a href="/admin/bulk?resource_name=Product&edit=metafields.faq.q-one%3Astring%2Cmetafields.faq.a-one%3Astring%2Cmetafields.faq.q-two%3Astring%2Cmetafields.faq.a-two%3Astring%2Cmetafields.faq.q-three%3Astring%2Cmetafields.faq.a-three%3Astring%2Cmetafields.faq.q-four%3Astring%2Cmetafields.faq.a-four%3Astring">
      Edit metadata
    </a>
  </p>
{% endif %}
That URL is generated from the form we created earlier. As this markup appears in theproduct.liquid, our URL is particular only to the metafield. You can also generate an edit link from another set of meta-data using the add metafield form. As you know, the querystring generated by the metafield goes both ways. First, you can pass it to the Shopify bulk editor. It will generate a spreadsheet-like way to edit the content. Also, if you want to pre-populate the correct values, you can do it passing it back to that metafield form. For instance, if you want to add a fifth FAQ, then all you need is to take the real querystring and then add it to the end of wherever you store the metafield page. You can make adjustments to the form. That’s how, proceeding it onwards, you can generate a new URL. Note that the content authors using this can see all the existing data. Also, the new cells for them for adding the new FAQ with questions and answers.
Performance
There’s a high chance that your Shopify store will be populated with numerous products and it isn’t astonishing that several products may have almost ten plus variations. It will probably generate some huge select boxes. It doesn’t matter if this page or that version is not meant for your customers, performance is something you should be always cautious about. That’s the main reason why each of the select boxes appears in a separate snippet. It allows you to split them out on different pages and if required you can split them according to your preference.
Security
You may not want the customers to stumble upon the metafield editing pages, and all those pages are basically doing is to generate the links that point to the /admin/ section of your Shopify store. So, if mistakenly or deliberately, the customers or competitors stumble upon these pages, they will need access to absolute valid credentials in order to edit or see any of the store data. So, in this way, you only give a list of your products and their identification numbers. However, the catalogue page on your Shopify store already provides this information. If you want, you can hide the content behind the admin variable in such a way that your customers will only see a blank page and nothing else. ‘
{% if admin == 'true' %}
  (metafield forms go here)
{% endif %}
We can add metafields to several types of content. These include blogs, product images, customers, draft orders, and orders. It also allows you to see all the metafields for any specific content in JSON format. You can edit theproduct.liquid template to get them on the frontend as:
{% comment %}
Check if there's anything in our FAQ namespace
{% endcomment %}
{% if product.metafields.faq.size > 0 %}

  {% unless product.metafields.faq.q-one == blank %}
    <h2>{{ product.metafields.faq.q-one }}</h2>
  {% endunless %}

  {% unless product.metafields.faq.a-one == blank %}
    <p>{{ product.metafields.faq.a-one }}</p>
  {% endunless %}

{% endif %}
You may be using the get method to sort all the fake API access. As you know, the get and post method mirror the functionality of HTTP and they include one more method that is the delete. There was a time when Firefox used to support the delete method but now, there is very little probability that it will become part of a standard for right now. However, if you want to edit an old metafield, then all you need is to remove its content and it will vanish from the JSON asap.


