

Looking for a complete Shopify search guide? See our Shopify product search guide.
In the fast-paced world of e-commerce, a seamless and efficient search experience is paramount for online store success. Shopify, being a popular e-commerce platform, offers a robust search functionality, but optimizing it further can significantly enhance user satisfaction and boost conversions. In this guide, we’ll explore the importance of optimizing Shopify search results and provide actionable tips to elevate the overall user experience.The Importance of Optimizing Search Results on Shopify:
1. User Engagement and Retention:
A well-optimized search function encourages users to explore your website, find products easily, and stay engaged. By providing relevant and accurate search results, you increase the likelihood of users finding what they’re looking for, leading to improved user retention.2. Conversion Rates:
Efficient search results directly impact conversion rates. When users can quickly locate and purchase their desired products, it reduces friction in the buying process, ultimately contributing to higher conversion rates.3. Customer Satisfaction:
Customer satisfaction is a key metric for the success of any online store. A positive search experience ensures that customers can easily navigate your site, find products effortlessly, and have an overall enjoyable shopping experience.Tips for Optimizing Shopify Search Results:
1. Implement Autocomplete Suggestions:
Enhance the search bar with autocomplete suggestions to assist users in finding products faster. Utilize algorithms that consider popular searches, previous user interactions, and trending items to provide relevant suggestions.2. Integrate Visual Search:
Visual search functionality allows users to search for products using images. This feature can be particularly beneficial for fashion and home decor stores where customers may have a specific visual preference in mind.3. Utilize Synonyms and Misspelling Corrections:
Account for user errors by incorporating synonym recognition and misspelling corrections. This ensures that even if a user makes a typing mistake or uses different terms, the search results remain accurate and helpful.4. Prioritize Relevant Results:
Implement algorithms that prioritize products based on popularity, relevance, and user behavior. This ensures that the most relevant items appear at the top of the search results, increasing the likelihood of conversions.5. Optimize Product Descriptions and Metadata:
Ensure that product descriptions and metadata are well-crafted and contain relevant keywords. This not only helps search engines index your products effectively but also improves the accuracy of search results.6. Regularly Analyze Search Analytics:
Leverage Shopify’s analytics tools to understand user search patterns and behaviours. Regularly analyze search queries to identify trends, popular products, and areas for improvement in the search experience.7. Make sure Your Shopify store’s search bar is prominent:
A prominent search bar is crucial for enhancing the user experience and improving search functionality on your Shopify store. Ensure that the search bar is prominently placed in a visible location, such as the header or top navigation menu, where customers can easily locate it. Consider using contrasting colours or design elements to make the search bar stand out and attract attention. Additionally, optimize the size and placement of the search bar for different devices, ensuring it remains accessible and user-friendly on mobile devices as well. By making the search bar prominent, you can encourage more customers to utilize the search feature and find products quickly, ultimately improving conversion rates and customer satisfaction.8. Show related products with the search results:
Enhance the search experience on your Shopify store by displaying related products alongside search results. By showing relevant product recommendations based on the customer’s search query, you can help customers discover additional items of interest and increase cross-selling opportunities. Implementing related product suggestions can be achieved through Shopify apps or custom development, leveraging algorithms that analyze search queries and product data to generate personalized recommendations. This not only improves the relevance of search results but also enhances the overall shopping experience for customers, leading to higher engagement and sales.9. Search that understands your customer (Using NLP):
Take your Shopify store’s search functionality to the next level by incorporating Natural Language Processing (NLP) technology. NLP enables your search engine to understand and interpret the meaning behind customer queries, allowing for more accurate and relevant search results. By analyzing the context, intent, and semantics of search queries, NLP-powered search engines can better understand customer preferences and deliver personalized results. This enables features such as autocomplete suggestions, synonym recognition, and predictive search, which anticipate customer needs and streamline the search process. Integrating NLP technology into your Shopify store’s search functionality can significantly improve user satisfaction, conversion rates, and overall store performance.10. Search Analytics:
Gain valuable insights into customer behaviour and search patterns on your Shopify store by utilizing search analytics tools. Search analytics provide merchants with detailed data and metrics related to customer searches, including popular search terms, search frequency, click-through rates, and conversion rates. By analyzing this data, merchants can identify trends, uncover customer preferences, and optimize their product offerings and search functionality accordingly. By leveraging search analytics, merchants can make data-driven decisions to enhance the search experience, drive more conversions, and maximize the success of their Shopify store.Customizing Shopify Search Results for Enhanced Performance:
Shopify is a great platform to launch your e-commerce store. Unfortunately, the default search function is not so great. So it would need some customization to make it perform better. In this article, we will check out how to create a Shopify search results page in the easiest way possible.
Install Expertrec smart search bar to your shopify store
Manual Customization Using Theme Code:
If you prefer a more hands-on approach, you can customize your storefront search by editing the theme code. Here are some customization options:Searching only for certain types
You can restrict the type of objects that are returned by the online store search. For example, you can choose to return products, but not pages or articles. To control the objects that are returned, you need to use thetype parameter.
The options are:
product– Search results contain matching products only.article– Search results contain matching blog articles only.page– Search results contain matching pages only.
type parameter can include any combination of product, page, and article separated by commas. For example, if you only want to search for product and article results, then the type can be specified as article,product.
The default type is article,page,product, which means that search results will contain matching blog articles, pages, and products.
You can set the type parameter by using a hidden field in the search form within search.liquid.
<form method=“get” action=“/search”> <input type=“hidden” name=“type” value=“product” /> … </form>
Sorting search results based on product availability
You can use theunavailable_products option in your theme code to change the order in which search results are returned based on product availability. The options are:
show– Search results are sorted by relevance.hide– Search results are sorted by relevance, and unavailable products will not appear in the search results.last– Search results are sorted by availability and then by relevance. This means that unavailable products are pushed below other matching search results.
last.
If you want to sort unavailable products by another value than the default, then you can add a hidden field in the search form within search.liquid.
<form method=“get” action=“/search”> <input type=“hidden” name=“options[unavailable_products]” value=“show” /> … </form>
Enabling partial word matches
You can specify whether a partial word match should be applied to the last term in a search query. This means that the search will attempt to complete the last word of the search query. For example, if a query is made onwinter snow, then a search will be made on all resources that contain the term winter and a term that starts with snow such as snow, snowboard, or snowshoe.
Partial word matches can be enabled by setting an prefix option in your theme code. The options are:
last– Partial word matches are enabled for the last search term.none– No partial word matches are performed.
none.
If you want to enable partial word matches on the last term, then you can add a hidden field in the search form within search.liquid.
<form method=“get” action=“/search”> <input type=“hidden” name=“options[prefix]” value=“last” /> … </form>
Easy Way- Customizing Using an App
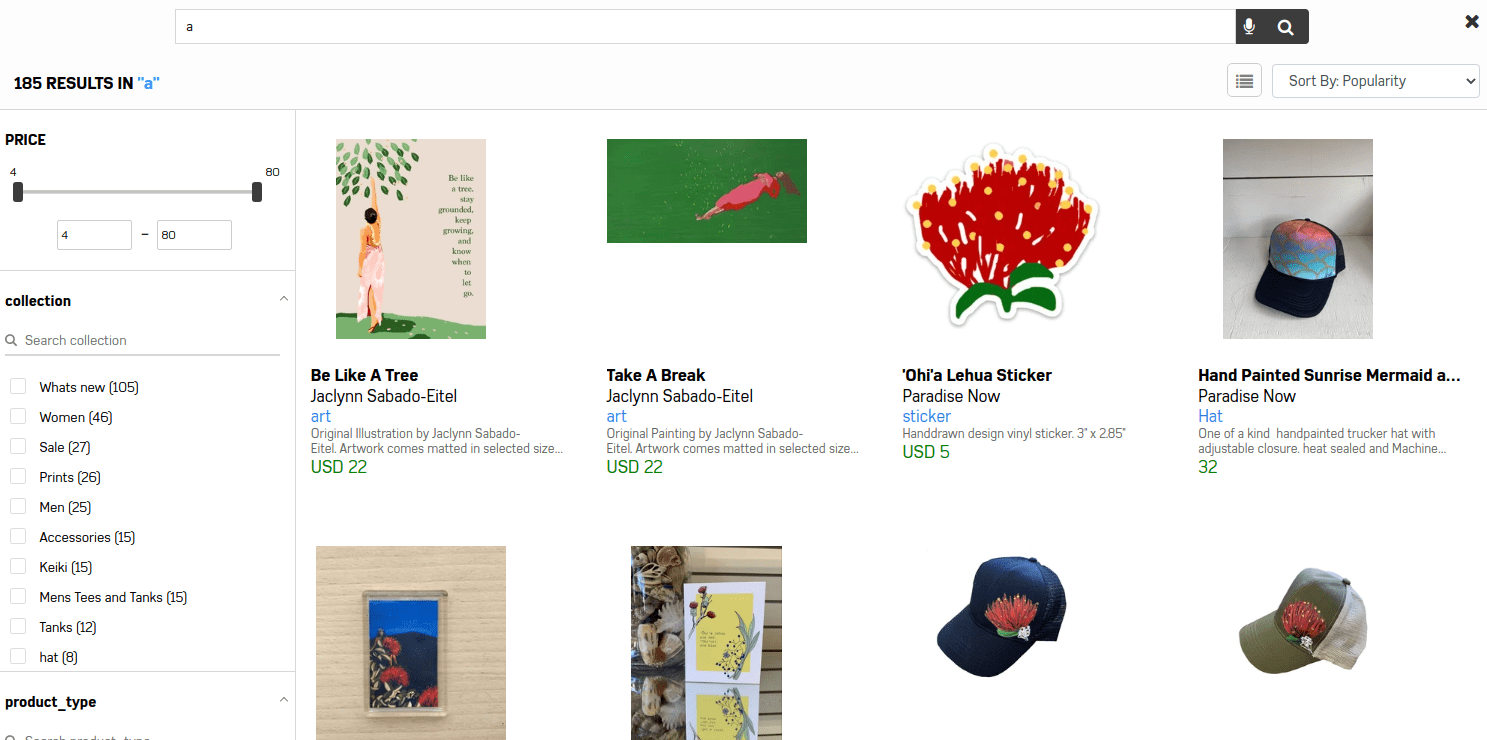
An easy way to add the search results page in Shopify is to install the Expertrec smart search bar app from the Shopify app store. This by default creates a Shopify search engine that has an auto-complete and search results page that you can make changes to suit your website’s needs.

- Sort by popularity.
- Sort by price: low to high, high to low.
- Price slider.
- Filters for categories, product types, and more.

Manually customizing the default Shopify search results page
By default, Expertrec App creates a page with the handle “expertrec-search” which will be accessible with URL yourstore.myshopify.com/pages/expertrec-search .To customize this page, follow these steps:- Navigate to your dashboard https://cse.expertrec.com/ecom/home
- Under UI-Customization there are a lot of options like layout, custom CSS editor, pagination, filters, etc.
Install Expertrec smart search bar to your shopify store
Creating a new search results page in Shopify
Shopify allows you to create custom pages, but it does not allow easy customization on top of it. Here are steps to create a new search results page in Shopify- Install ExpertRec’s Smart Search bar plugin.
- Login to your shopify admin panel.
- Go to your admin page at yourStore.myshopify.com/admin
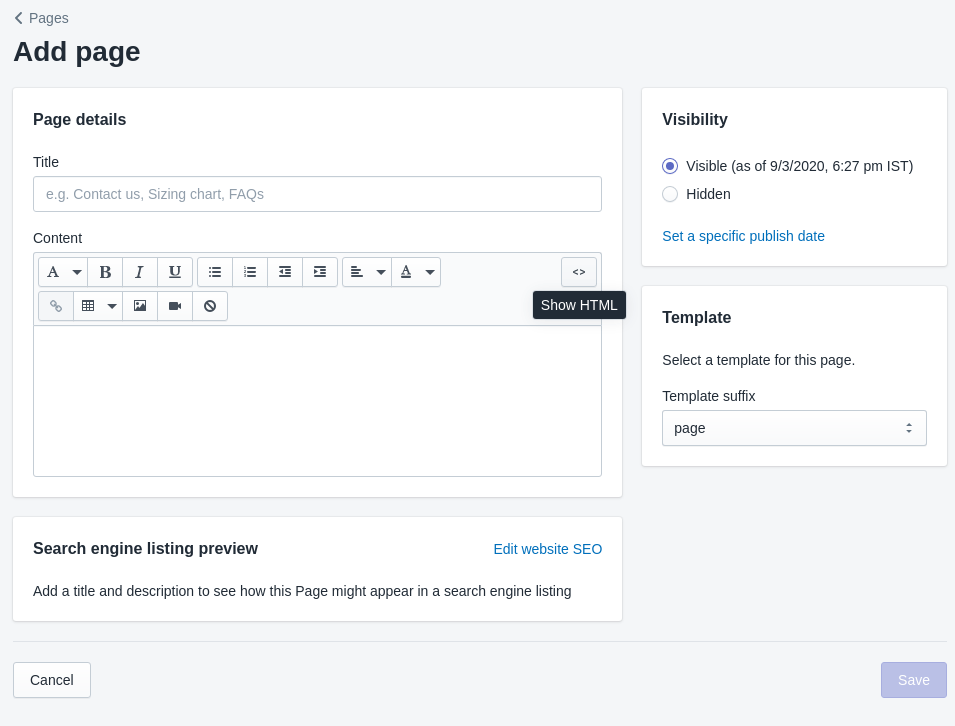
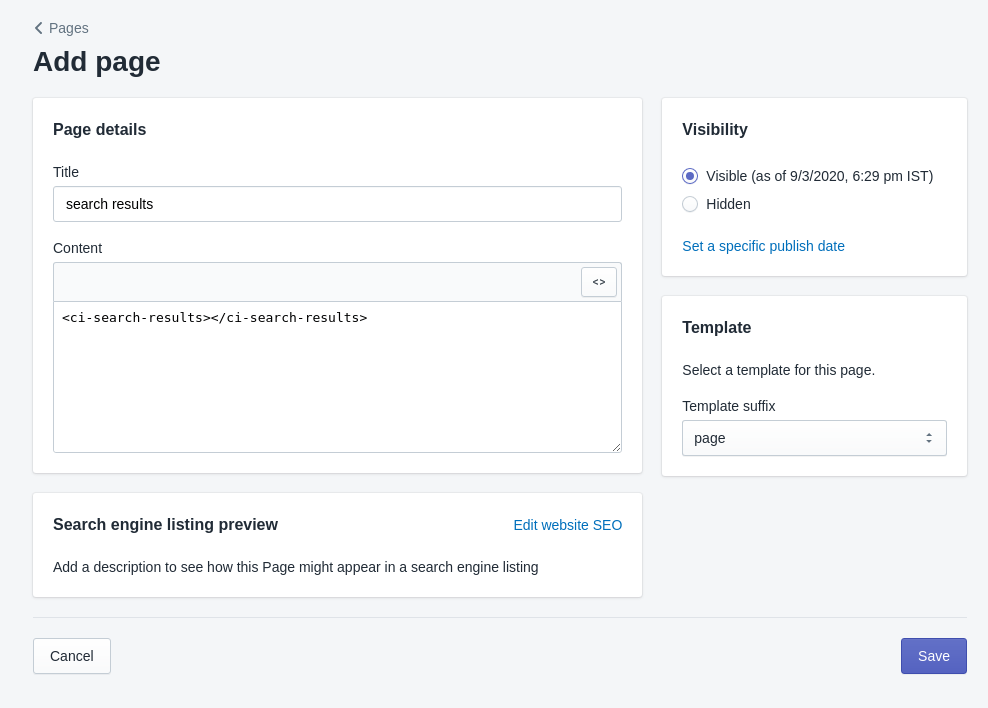
- Using the left menu pane, navigate to Online Store -> Pages

- Click on Add Page to open up the page editor.
- Use the <> icon to toggle to HTML mode. You can write HTML code here if you are coder.
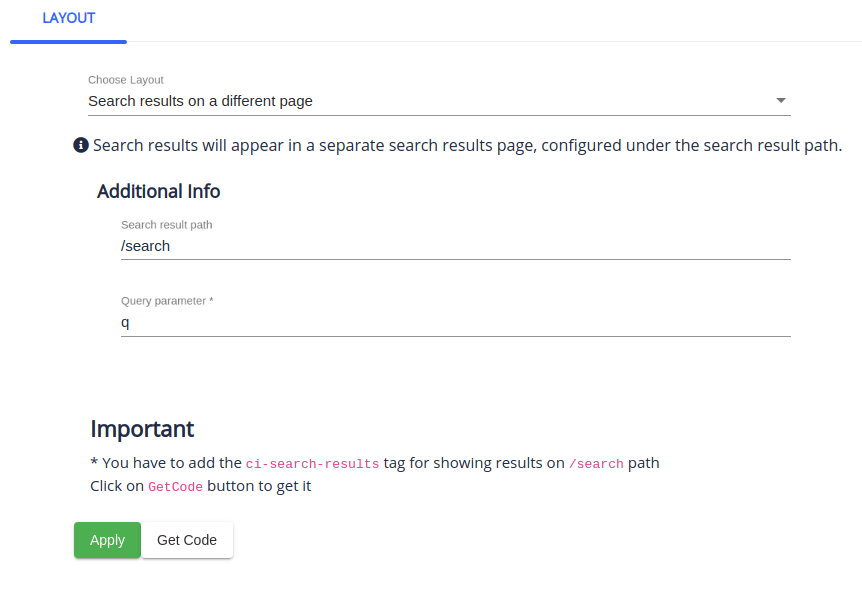
- I suggest that you add the <ci-search-results></ci-search-results> tag that comes with ExpertRec’s Smart Search bar plugin here and does the customization without any coding from the plugins dashboard.


- In your ExpertRec dashboard, make sure that you have switched to search results on a different page mode and that you have to set the path to the search results page as page/your-page-path.


Conclusion:
Investing time and effort into optimizing your Shopify search results is a strategic move that can yield significant benefits. By prioritizing user experience and implementing advanced search functionalities, you not only enhance customer satisfaction but also contribute to increased engagement and conversions. Keep refining your search strategy, stay attuned to customer feedback, and watch your Shopify store thrive in the competitive e-commerce landscape.FAQs
1. How does Shopify search work?
Shopify search functionality allows customers to find products, collections, and pages within a Shopify store. It typically operates through a search bar located on the website. When a user enters a query, Shopify’s search algorithm scans the store’s product titles, descriptions, tags, and other relevant metadata to find matching results. These results are then displayed to the user, usually ranked by relevance. Shopify’s search functionality can be further customized and optimized through various apps and settings within the Shopify admin dashboard.2. How to add a search bar in Shopify?
Adding a search bar to a Shopify store is simple. In the Shopify admin dashboard, navigate to the “Online Store” section and select “Themes.” Find the theme you’re using and click “Customize.” From there, you can usually add a search bar element to your header or footer by selecting the appropriate section and adding a search bar component. If your theme doesn’t support this feature, you can explore Shopify’s app store for search bar apps that can be easily integrated into your store.3. How to edit the search bar in Shopify?
Editing the appearance and functionality of the search bar in Shopify can be done through your theme’s customization options or by modifying the theme’s code. In the Shopify admin dashboard, navigate to “Online Store” > “Themes” > “Customize” and locate the section where the search bar is located. Depending on your theme, you may be able to adjust settings such as size, colour, placeholder text, and search behaviour directly within the customization interface. For more advanced customization, you may need to edit the theme’s code using HTML, CSS, and Liquid.4. How to hide a product from search on Shopify?
To hide a product from search results on Shopify, you can adjust its visibility settings within the product editor. In the Shopify admin dashboard, navigate to “Products” and select the product you want to hide. Scroll down to the “Visibility” section and uncheck the option that says “Online Store.” This will remove the product from your online store, including search results, while keeping it accessible for manual orders or direct links. Alternatively, you can use app integrations or code customization to achieve more granular control over product visibility.5. How to remove the search bar from Shopify?
Removing the search bar from your Shopify store typically involves customizing your theme’s layout or code. In the Shopify admin dashboard, navigate to “Online Store” > “Themes” > “Customize.” Depending on your theme, you may be able to find an option to remove the search bar directly within the customization interface. If not, you’ll need to access your theme’s code editor and locate the section responsible for rendering the search bar. Remove or comment out the relevant code, and remember to save your changes before exiting the code editor.6. Does Shopify offer advanced search features?
Shopify provides basic search functionality out-of-the-box, allowing customers to search for products, collections, and pages within a store. However, for merchants seeking more advanced search capabilities, there are third-party apps like Expertrec available in the Shopify App Store that offer features such as autocomplete, typo tolerance, faceted search, and advanced filtering options. Merchants can choose a search app that best fits their store’s needs and budget to enhance the search experience for their customers.7. How to customize my Shopify search bar?
Customizing the search bar in Shopify can be done through theme customization settings or by editing the theme’s code. In the Shopify admin dashboard, navigate to “Online Store” > “Themes” > “Customize.” Depending on your theme, you may find options to customize the search bar’s appearance, size, colour, placeholder text, and search behaviour within the customization interface. For more advanced customization, such as adding autocomplete or filtering options, you may need to modify the theme’s code using HTML, CSS, and Liquid.8. How to make a search bar on Shopify?
Creating a search bar on Shopify is typically part of the theme customization process. In the Shopify admin dashboard, navigate to “Online Store” > “Themes” > “Customize” and locate the header or footer section where you want to add the search bar. Depending on your theme, you may find an option to add a search bar component directly within the customization interface. Alternatively, you can edit the theme’s code to insert a search bar HTML element and style it using CSS to match your store’s design and branding.9. How to hide sold-out products from search results on Expertrec.
Searching for a product to see the out-of-stock sign or symbol on it can be depressing for both the business owner and the user. So most e-commerce stores hide the sold-out products from appearing on the search results page to prevent customers from adding such products to their cart. However, replacing the sold product with a similar one that might interest the customer is advisable. These tactics ensure you don’t lose a customer due to being out of stock. To find out how to hide sold products from appearing in search results, follow the steps below.- Go to the Expertrec control panel and navigate to the Store-preference section.
- Choose Exclude or Demote option to hide/demote the out-of-stock products.
- Click on Update to save the changes.
10. How do I edit a product page on Shopify?
Your product page is your most significant selling point as an e-commerce store owner. Therefore, your product page should be designed in a way that captivates the attention of your visitors. Image quality, description, and arrangements are essential factors in a product page. Shopify winning the top 3 best e-commerce platforms, comes with a customizable product page service. You can edit your product page to look exactly how you want it. You can add or remove products and also be able to edit product descriptions. Follow the steps below to learn how to implement changes on your Shopify product page.- Add a new product.
- Go to products and all products on the Shopify app.
- Click the plus icon and then enter a title and description for your product.
- Then tap save.
- Edit a product.
- Go to products from your Shopify admin account.
- Select the product you want to effect changes.
- Make the changes you want and click save.
- Add or remove tags.
- Go to products from your Shopify admin account.
- Select the product you want to tag or create a new product.
- Scroll to the organization section, and select a tag for your product. Tags can contain up to 255 characters and are separated with the help of a comma.
- Click save when you are done.
- Follow the same steps written above.
- Click the x close to the tag instead of writing a new one.
- Then save
- Delete a product.
- Follow step one as written above.
- On the products section, click on the product details you want to delete.
- Select delete product, and it’s gone.
- To Archive a product.
- Follow the procedures as written above for numbers one and two.
- Then Click on archive product instead of delete product.
Install Expertrec smart search bar to your shopify store
Go to Online Store, then Themes, click Actions and Edit Code. Find the search.liquid or search-template.liquid file under Templates. You can modify the HTML, CSS, and Liquid code to change the layout, styling, and behavior of your search results page.
Yes. You can change the layout by editing your theme’s search template, using the Theme Editor’s section settings, or installing a search app like ExpertRec that offers grid and list views, custom sorting options, and responsive layouts.
Improve relevance by adding detailed product titles and descriptions, using consistent tags, and installing a search app with AI-powered ranking. ExpertRec uses machine learning to understand search intent and return the most relevant products first.


