Read google search appliance repurpose for more information.
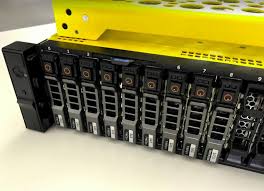
Google Search Appliance was the name of a rack-mounted device that was capable of performing the document indexing and related functionality. Its operating system is that of CentOS. The hardware is manufactured by Dell while the software is prepared by Google.
Google Search Appliance technology support will assist those customers who want to repurpose the Gx00 search appliance. Google support is the only way to unlock it. But, you need to first contact the support team and then allow remote access to the unit.

However, if you are in the mood for Google Search Appliance repurpose, then you are not supposed to make use of these instructions. Instead of these instructions, you should know how to repurpose the appliance when the license expires. You can even make use of a Google Search Appliance which has been decommissioned in the form of a decent server.
Moreover, when going through this article, you will also know about a way to repurpose the hardware to a generic server. Talking about the Google Mini which is a search appliance which many companies use most of the time. For most businessmen, Google Mini ran their website search, so they were curious to know if it could be repurposed.
Google has also stored search appliances for enterprise customers. That is why most businessmen expect that it will be fun to repurpose it for one or two projects, and if possible then for a huge number of different projects.
Some companies replace the BIOS chip present on the motherboard with a well-known working version. This points out to the fact that the BIOS chip is easily removable. However, the BIOS will not provide the USB boot option without having a valid USB drive inside the slot. You need to load the USB with a bootable operating system and insert inside one of the rear USB slots.

When the boot startup begins, you need to press DEL to enter the BIOS. When you need to enter the password, you can use the password AWARD_SW. Also, you will realize that the AMIBios which is the default one has never changed.
You may consider installing a new OS and using the hardware for other purposes when the license of the GSA expires.
Gx00 model (T4/T5/U3/U4)
Starting January 26, 2017, Google Search Appliance Tech Support will assist customers who want to repurpose the Gx00 (T4/T5/U3/U4) search appliance, if the following conditions are met:
1. There is direct SSH or Support Call remote access to your search appliance.
2. The license on your search appliance has expired.
3. Minimum GSA software version is 7.4.0.G.120. Update instructions and links to binaries can be found here.
Google recommends you also perform these steps for a successful update:
3.1. Enable SSH
3.2. Reset index
3.3. Reboot the GSA
3.4. Proceed with the update.
Google also recommends that you apply the update by connecting directly to the orange port of the GSA with a laptop.
If you want to repurpose your search appliance, please contact Google Cloud Support. Please select the Tech Support group during the request submission.
S5 model
The appliance ID of the S5 model appliances starts with “S5-“. The hardware of the S5 model appliances is Dell 2950. In order to install a new OS, you should erase all the data on the appliance by initializing the virtual disk. Details about initializing virtual disks can be found in the document titled Dell™ PowerEdge™ Expandable RAID Controller 5/i and 5/E User’s Guide, in the section with the title RAID Configuration and Management. The document is accessible on Dell’s support site.
After the virtual disk is initialized, upon restart, the machine will attempt to boot from the network and external USB media, thus allowing you to install a new OS. You will need either a boot server on the network or a bootable media with USB interface, such as an external DVD drive or USB stick. This procedure is described in the following steps.
- Press Alt-Ctrl-Delete keys to reboot the machine.
- Press Ctrl-R when prompted to enter the Virtual Disk Management menu.
- On the VD Mgmt screen, select Virtual Disk 0 and press F2 to display the actions.
- From the action list, select Initialization, then Fast Init. Fast Init should finish in a few seconds.
- Press the Esc key to exit. You will be prompted to press Alt-Ctrl-Delete to reboot.
- Upon reboot, the machine will attempt to boot from the network. If a network boot server is unavailable and a bootable USB media is attached, it will attempt to boot from the USB media.
- Install a new OS.
T2/T3 model
The appliance ID of the T2/T3 model appliances starts with “T2-” or “T3-“. The hardware of the T2/T3 model appliances is Dell R710. In order to install a new OS, you should erase all the data on the appliance by initializing the virtual disks. Details about initializing virtual disks can be found in the document titled Dell PERC 6/i, PERC 6/E, and CERC 6/i User’s Guide, in the section with title BIOS Configuration Utility. The document is available for download at Dell’s support site.
After the virtual disks are initialized, upon restart, the machine will attempt to boot from the network and external USB media, thus allowing you to install a new OS. You will need either a boot server on the network or a bootable media with a USB interface, such as an external DVD drive or USB stick. This procedure is described in the following steps.
- Press Alt-Ctrl-Delete keys to reboot the machine.
- Press Ctrl-R when prompted to enter the PERC BIOS Configuration Utility.
- On the VD Mgmt screen, select Virtual Disk 0 and press F2 to display the actions.
- From the action list, select Initialization, then Fast Init. Fast Init should finish in a few seconds.
- For T2 model only. Initialize Virtual Disk 1andVirtual Disk 2 with the Fast Init option as well.
- Optional (execute this step only if you want to change the RAID configuration) – move up to the top item (controller level) and press F2. From the action list, select clear Config to remove the RAID configuration of your appliance.
- Press the Esc key to exit. You will be prompted to press Alt-Ctrl-Delete to reboot.
- Upon reboot, the machine will attempt to boot from the network. If a network boot server is unavailable and a bootable USB media is attached, it will attempt to boot from the USB media.
- Install a new OS.
U1/U2 model
The appliance ID of the U1/U2 model appliances starts with “U1-” or “U2-“. The hardware of the U1/U2 model appliances is Dell R710 with an external storage unit MD1000 or MD1220. To install a new OS, you should erase all the data on the appliance by initializing the virtual disks. Details about initializing virtual disks can be found in the document titled Dell PERC 6/i, PERC 6/E, and CERC 6/i User’s Guide, in the section with title BIOS Configuration Utility. The document is available for download at Dell’s support site.
After the virtual disks are initialized, upon restart, the machine will attempt to boot from the network and external USB media, thus allowing you to install a new OS. You will need either a boot server on the network or a bootable media with a USB interface, such as an external DVD drive or USB stick. This procedure is described in the following steps.
- Press Alt-Ctrl-Delete keys to reboot the machine.
- Press Ctrl-R when prompted to enter the PERC BIOS Configuration Utility.
- On the VD Mgmt screen, select Virtual Disk 0 and press F2 to display the actions.
- From the action list, select Initialization, then Fast Init. Fast Init should finish in a few seconds.
- For U1, there are six DVDs to initialize. For U2, there are three VDs to initialize. Repeat steps 4 and 5 to initialize all VDs on that controller.
- Optional (execute this step and next two steps only if you want to change the RAID configuration) – move up to the top item (controller level) and press F2. From the action list, select Clear Config to remove the RAID configuration of your appliance.
- Optional – press the Esc key to go back to the controller selection screen.
- Optional – select the second controller and repeat steps 7 and 8 to clear the RAID configuration.
- Press the Esc key to exit. You will be prompted to press Alt-Ctrl-Delete to reboot.
- Upon reboot, the machine will attempt to boot from the network. If a network boot server is unavailable and a bootable USB media is attached, it will attempt to boot from the USB media.
- Install a new OS.
Was this helpful?
You can also look for a google search appliance replacement from expertrec.


