

Shopify search autocomplete is the best way to encourage the discovery of a product. Also, there are countless benefits like narrowing down the user’s search query scope by product category, availability, correcting misspellings, or even helping you in promoting newly launched products. All credits go to Shopify search autocomplete functionalities. You can add it either by using a plugin or by introducing some heavy code into the code editor.

Add Shopify Search Autocomplete in less than 2 minutes
3 Best Ways to Add Shopify Search Autocomplete
Here are the two steps to enable or add autocomplete for your search bar in the Shopify store.
- Using the Expertrec plugin
- Copying code from the Expertrec dashboard
- Applying code in Shopify code editor
Let’s know how to add Shopify search autocomplete in more detail.
Using the Expertrec plugin
Install Expertrec Smart Search Bar from Shopify App Store. And, yes, this is the best and easiest way to enable Shopify search autocomplete in less than 2 minutes. What are you waiting for? Grab your Maggie and start installing Expertrec Smart Search Bar. (It’s officially listed in Shopify App Store)
1. Click on https://apps.shopify.com/expertrec-smart-search-bar and hit the green Add app button.

2. Now, you need to click on install the app at the bottom right side.
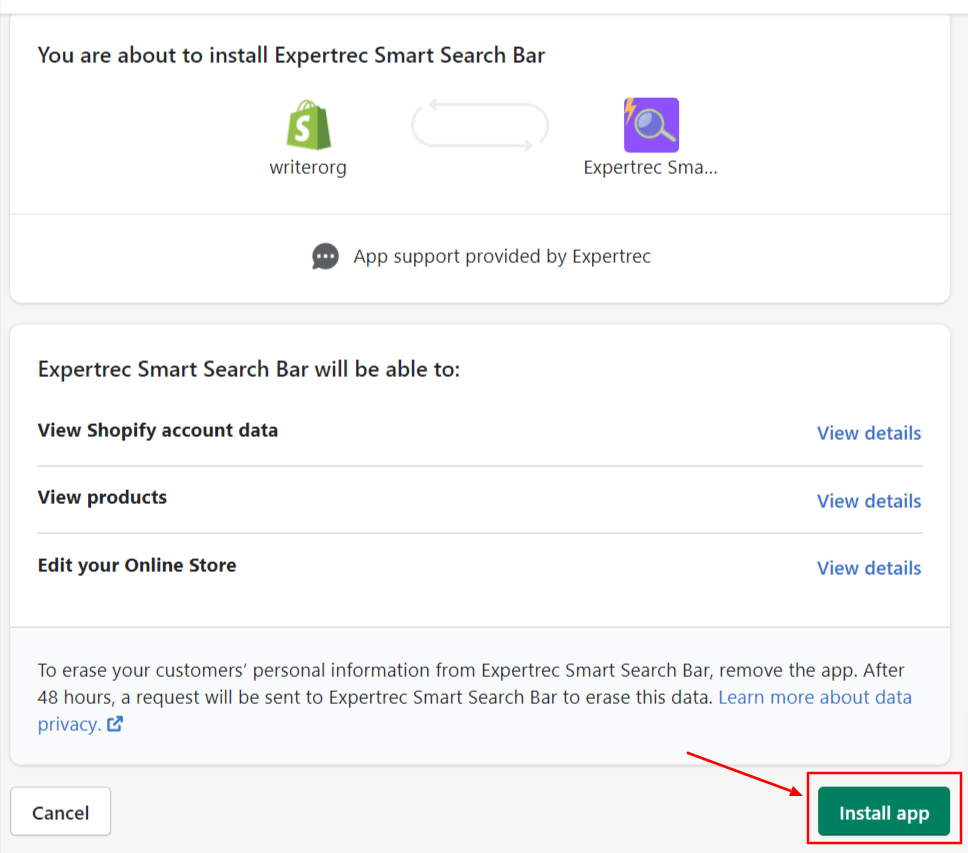
3. That’s the best part. I love it! Expertrec offers you a 14-day free trial. And, you know the best part of it? You don’t need to add any credit card details for it. It’s absolutely free. All you need is to click on “Start Free Trial”, and here you go.

Expertrec Smart Search Bar is successfully installed in your Shopify store. Now, you have the access to not only auto-complete functionality but also several more like voice search, autosuggestions, real-time indexing, zero ads, super-fast search, and what not? To explore more about Expertrec Smart Search Bar benefits, you can go through Shopify Search Products – Handling Online Store.
Wanna make a quick checkout?
- Log in to your Shopify admin panel.
- Go to the Apps section.
- You can see Expertrec Smart Search Bar as shown below:
Enjoy and explore the app!
Copying code from the Expertrec dashboard
Well, copying code from the Expertrec dashboard is the next best method to enable Shopify search autocomplete after adding the Expertrec Smart Search Bar plugin in your store. For this, you have to follow these simple steps:
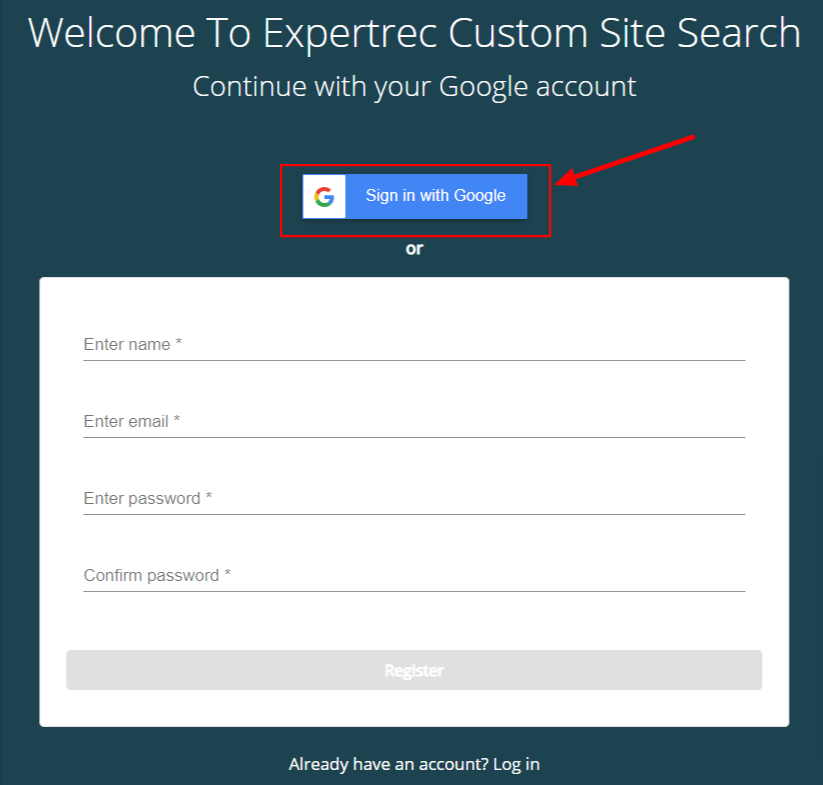
1. Click on https://cse.expertrec.com and Sign in with your Google Account.

2. Enter the Shopify store URL and head on to the Expertrec dashboard.


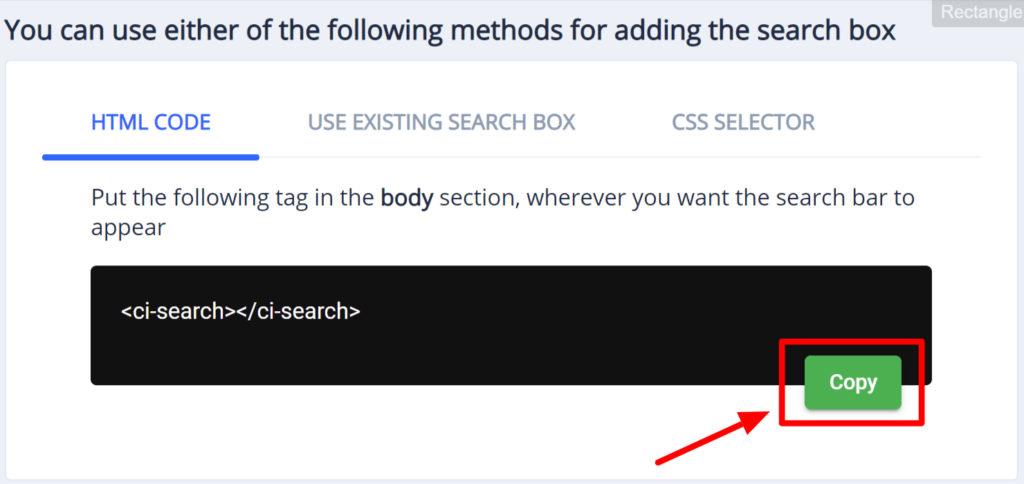
3. In the Install section of the Expertrec dashboard, click on code and copy the code and the tag that appears on the right-hand side. For instance, if you want to use your existing search bar but want to integrate autocomplete functionality into it, then click on “Use existing Search Box.”

4. Now, log in to your Shopify store and open the admin panel. Here, click on the Online Store option as shown below and click on the Themes.

5. There’s the Actions button on the right-hand side. Click on it, and a drag-down menu will appear. As you can see, click on the Edit code option located at the second top from the bottom.

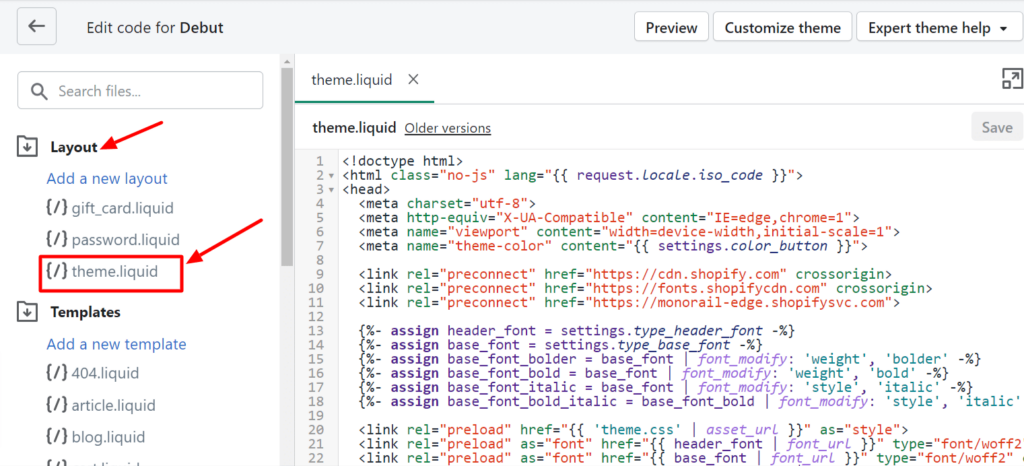
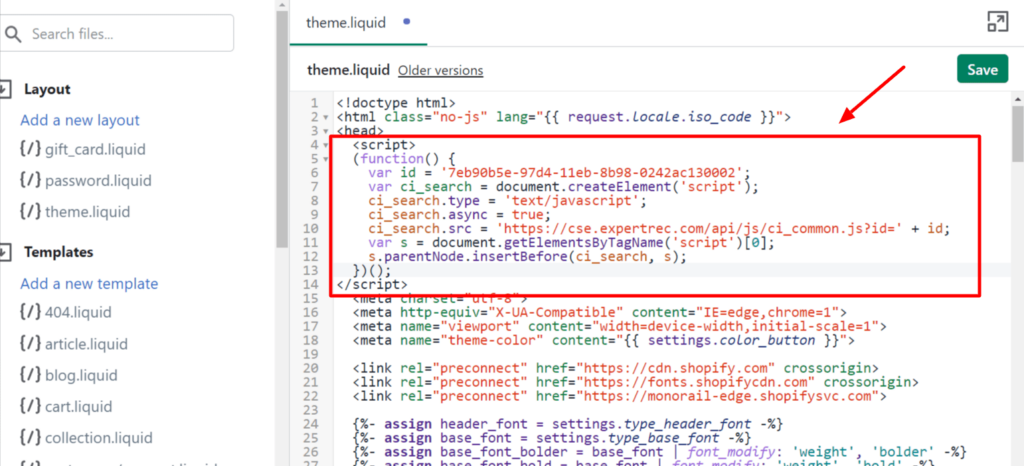
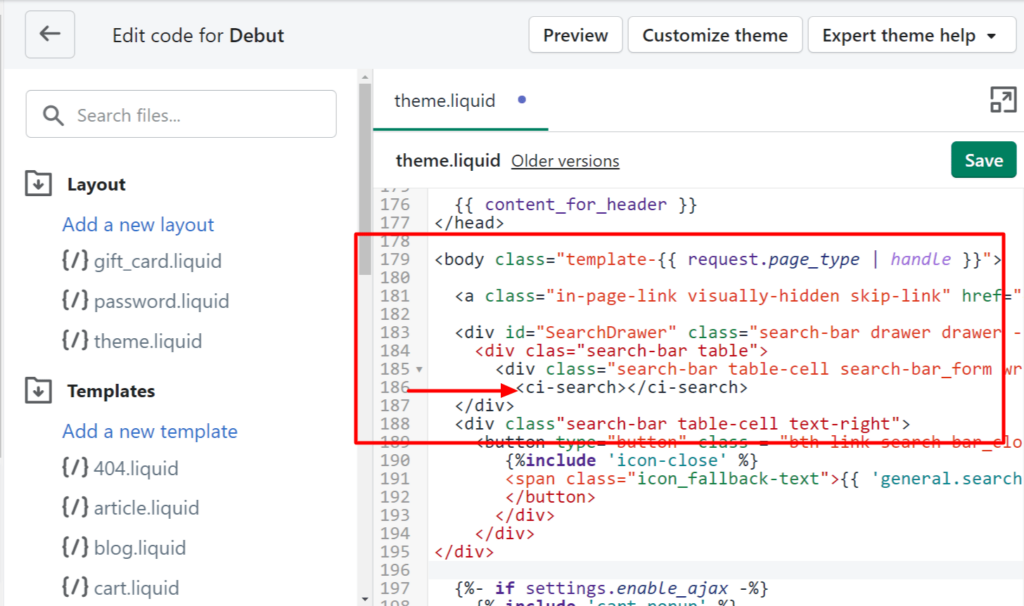
5. In the Layout folder, click on theme.liquid at the bottom side for adding the Expertrec code that you recently copied from the dashboard.
6. Paste the code in the <head> section and the HTML tag in the <body> section between the two <div> as shown below:
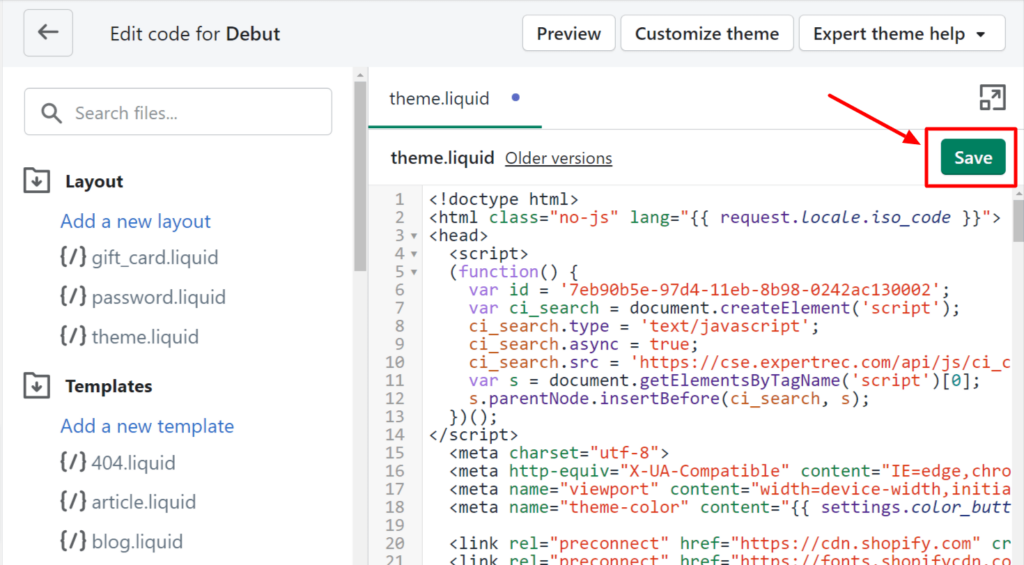
7. Save the code.
You have got the Expertrec search bar with autocomplete functionality by just copying the code from the Expertrec dashboard. You can open your online store by clicking on the eye button, and here you get the Expertrec search bar which is highly customizable.
Demo website:

This is how your online store will look like after installing the Expertrec Smart Search Bar. I know it’s a really enthralling experience. It changes the look and feels of the website. By the way, you can also change the UI of your search bar by just heading to the Expertrec dashboard and exploring the various possibilities.
Applying code in Shopify code editor
Using the Expertrec search bar is a completely different experience. Still, if you want to merely autocomplete functionality, then you can apply the code for autocompletion. You may need a little bit of coding inclination because that’s how code works.
Here are the steps to add Shopify search autocomplete by adding code in the online code editor.
I). Create a new template in the Edit code section for the search page.
1. Hit the Online Store -> Themes.
2. On the right-hand side, click on Actions. Then, in the drop-down menu, click on Edit code.

3. Click on Add a new template in the Templates folder that is just below the Layout folder.
4. Here, choose the options for your new template. I’ve selected search since I want to create a new template for search where the template name is given as JSON.

5. Now, click on the Create template button, and a new template will open in your code editor.
6. The file looks full of codes. Right? Worry not. These are just default codes, and you have to replace them with our new code.
7. Copy this code and paste it into that new template we recently created.
{% layout none %}
{% capture results %}
  {% for item in search.results %}
    {% assign product = item %}
    {
      "title"    : {{ product.title | json }},
      "url"      : {{ product.url | within: product.collections.last | json }},
      "thumbnail": {{ product.featured_image.src | product_img_url: 'thumb' | json }}
    }
    {% unless forloop.last %},{% endunless %}
  {% endfor %}
{% endcapture %}
{
  "results_count": {{ search.results_count }},
  "results": [{{ results }}]
}
II). Enable the search autocomplete
1. There’s Snippets directory as shown below. Click on Add a new snippet option. In that dialog box, enter the name of the snippet as search-autocomplete and click on the Create snippet button.

2. A fresh code editor will appear. Now, paste the following code on the code editor.
{% assign results_box_width = '242px' %}
{% assign results_box_background_color = '#ffffff' %}
{% assign results_box_border_color = '#d4d4d4' %}

<script>
$(function() {
  // Current Ajax request.
  var currentAjaxRequest = null;
  // Grabbing all search forms on the page, and adding a .search-results list to each.
  var searchForms = $('form[action="/search"]').css('position','relative').each(function() {
    // Grabbing text input.
    var input = $(this).find('input[name="q"]');
    // Adding a list for showing search results.
    var offSet = input.position().top + input.innerHeight();
    $('<ul class="search-results"></ul>').css( { 'position': 'absolute', 'left': '0px', 'top': offSet } ).appendTo($(this)).hide();
    // Listening to keyup and change on the text field within these search forms.
    input.attr('autocomplete', 'off').bind('keyup change', function() {
      // What's the search term?
      var term = $(this).val();
      // What's the search form?
      var form = $(this).closest('form');
      // What's the search URL?
      var searchURL = '/search?type=product&q=' + term;
      // What's the search results list?
      var resultsList = form.find('.search-results');
      // If that's a new term and it contains at least 3 characters.
      if (term.length > 3 && term != $(this).attr('data-old-term')) {
        // Saving old query.
        $(this).attr('data-old-term', term);
        // Killing any Ajax request that's currently being processed.
        if (currentAjaxRequest != null) currentAjaxRequest.abort();
        // Pulling results.
        currentAjaxRequest = $.getJSON(searchURL + '&view=json', function(data) {
          // Reset results.
          resultsList.empty();
          // If we have no results.
          if(data.results_count == 0) {
            // resultsList.html('<li><span class="title">No results.</span></li>');
            // resultsList.fadeIn(200);
            resultsList.hide();
          } else {
            // If we have results.
            $.each(data.results, function(index, item) {
              var link = $('<a></a>').attr('href', item.url);
              link.append('<span class="thumbnail"><img src="' + item.thumbnail + '" /></span>');
              link.append('<span class="title">' + item.title + '</span>');
              link.wrap('<li></li>');
              resultsList.append(link.parent());
            });
            // The Ajax request will return at the most 10 results.
            // If there are more than 10, let's link to the search results page.
            if(data.results_count > 10) {
              resultsList.append('<li><span class="title"><a href="' + searchURL + '">See all results (' + data.results_count + ')</a></span></li>');
            }
            resultsList.fadeIn(200);
          }
        });
      }
    });
  });
  // Clicking outside makes the results disappear.
  $('body').bind('click', function(){
    $('.search-results').hide();
  });
});
</script>

<!-- Some styles to get you started. -->
<style>
.search-results {
  z-index: 8889;
  list-style-type: none;
  width: {{ results_box_width }};
  margin: 0;
  padding: 0;
  background: {{ results_box_background_color }};
  border: 1px solid {{ results_box_border_color }};
  border-radius: 3px;
  -webkit-box-shadow: 0px 4px 7px 0px rgba(0,0,0,0.1);
  box-shadow: 0px 4px 7px 0px rgba(0,0,0,0.1);
  overflow: hidden;
}
.search-results li {
  display: block;
  width: 100%;
  height: 38px;
  margin: 0;
  padding: 0;
  border-top: 1px solid {{ results_box_border_color }};
  line-height: 38px;
  overflow: hidden;
}
.search-results li:first-child {
  border-top: none;
}
.search-results .title {
  float: left;
  width: {{ results_box_width | remove: 'px' | to_number | minus: 50 }}px;
  padding-left: 8px;
  white-space: nowrap;
  overflow: hidden;
  /* The text-overflow property is supported in all major browsers. */
  text-overflow: ellipsis;
  -o-text-overflow: ellipsis;
  text-align: left;
}
.search-results .thumbnail {
  float: left;
  display: block;
  width: 32px;
  height: 32px;
  margin: 3px 0 3px 3px;
  padding: 0;
  text-align: center;
  overflow: hidden;
}
</style>
3. Now, in the Layouts folder, search your theme.liquid file and open it in the code editor as shown below:
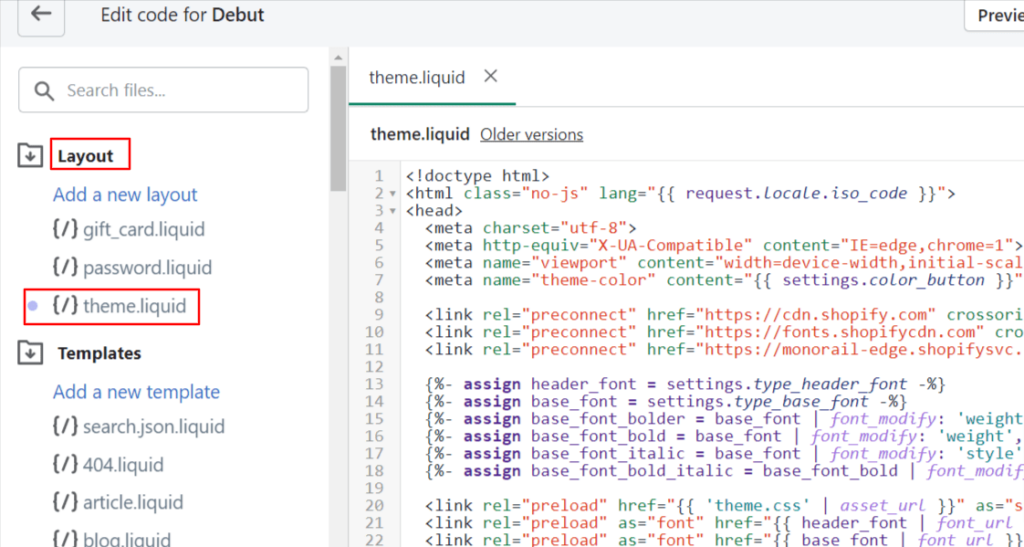
4. Scroll down until you find the closing tag. Right before it, paste this code as written below.
{% include 'search-autocomplete' %}
5. That’s all. You have enabled Shopify search autocomplete.
Why having Shopify Search Autocomplete is need for the hour?
Forget about everything. The golden rule is: “People love shortcuts”. And, why not? After all, getting more benefits with great comfort and convenience is way better than scratching head and trying to find something out of eternity (With billions of websites, Google is not anything less than that). So, if you are a website or business owner, then here are some benefits of having Shopify Search Autocomplete that you need to know right away:
Autocomplete functionalities
- Basic auto-complete
- Suggestions
- Fast Results
1. Basic auto-complete
With the most basic and minimalist approach, this functionality deals with showing search-as-you-type phrases. It keeps on matching whatever the user is searching for to all the products in your store. It’s something like predicting the query right at the moment the user is typing it.
2. Suggestions
This auto-complete feature is similar to auto-suggestions in several ways. Here, the user gets various suggestions while he is typing. The search engine, till then, keeps on suggesting to him several other keywords that are maybe popular or trending, or something in the history, or any other criteria. After that, it is completely up to the search engine.
3. Fast Results
If you have an e-commerce store, then make sure that searching is as fast as lightning speed. And, what’s better than showing up the results instantaneously someone starts searching for an item. Even most popular e-commerce sites like Amazon, Flipkart support fast results wherein the users get the result of the suggested product as they start searching for it.
Search benefits by having Autocomplete functionality
1. Your search bar understands the “words of users.”
Most people with less tech experience are not good at forming words to perform a successful search. Therefore, if they don’t receive the result on the very first step, after that, they are very likely to leave the site and discontinue the search.
Having an awesome search engine like Expertrec will help you to utilize the autocomplete suggestions for recommending the relevant product. In this way, you can bias them for selecting one of the shown products and get better results.
2. Simplicity is the key
If your website has hundreds or thousands of products, then make sure that all of them are properly categorized and sorted in a manageable list format. For the sake of clarity, you should style the data distinctively. It involves playing around with the UI and following the best practices.
Fortunately, Expertrec is here to take the load off. All you need is to sign up for a free trial, and the technical team will handle all the prerequisites for adding the best custom search engine to your website.
3. Top-ahead suggestions
When users search for something on your website, you can build top-ahead suggestions that will allow the users to add the trending strings at the end of the query. Obviously, it will help the users to replace their query with an already trending or popular one.
Wrapping it Up
Expertrec Custom Search Engine is the best and easiest way to gain numerous site search benefits along with Shopify search autocomplete. It inherits almost every feature that an awesome custom search engine must have. And, the winning theme is that it doesn’t require any coding. Even all you need is to just install the Expertrec Smart Search App from the Shopify store and start your free trial in less than two minutes.
So, what are you waiting for? Accelerate your Store growth by adding Expertrec Smart Search App and witness the most expected result, i.e., Growth!


