Content discovery is an important aspect of your website. Enabling your students to find the right course quickly will not only increase the UX but also provide you with a higher number of enrollments as well. Now that you have taken the first step towards this by installing ExpertRec’s search app, let’s take a look at some configurations that you can do to get the most out of the search.
Configuration
Right after installing the app, a search bar is added by default. The system initially attempts to place the search bar based on a pattern common to most Thinkific sites. If this fails it falls back to attempting to add it in various common locations preset in the ExpertRec dashboard. It is very rare for this to fail, but in the odd chance that it does, feel free to reach out to our support team to set the integration right.
From the dashboard, you have the option to change both the ranking of the search and the UI. You can also explore search analytics to figure out what your users are looking for.
Ranking
You can configure the ranking algorithm using search weights. Here you can determine which parts of the page the search should attempt to match the query and in what order. Fields at the top have a higher weight and pages that have a match in those fields will be ranked higher.
Boosting is. a way to modify the search weights based on additional criteria. For example, you can choose to promote all courses with a larger price by setting the ‘boost in proportion to price’ setting.
UI customization is currently confined to CSS. But we will be releasing new no-code UI controls for changing the appearance of the search bar and the results.
There is a lot more that you can do to get better results out of your search bar and I encourage you to try them out from the ExpertRec dashboard. Feel free to reach out to our support team at any time.
Please refer to the below video to learn how to install the ExpertRec app via the Thinkific appstore and how to do UI customizations using CSS.

UI Customization
This section gives you the power to modify the appearance of the search bar, the results and a few look and feel options. One of these options is the custom CSS editor which would enable you to write your own custom code and change the UI (User Interface).
If you are unfamiliar with CSS and/or do not want to get your hands dirty we will be more than happy to customize the search as per your requirements. Please do not hesitate to contact us via Email, Phone, Chat or raise a ticket.
Custom CSS Editor
This is one single window from where all UI aspects of the search like the search box, dropdown/autocomplete can be changed/ added by modifying/adding the CSS class to which they belong.
To make it easier by default, we have added the option (CSS class) of changing the colour of the search bar, suggestion/dropdown, the colour of the description of search results and the colour of the title of the result.
The format for the class looks something like this:
<parentclass> <htmltag> <childclass>
Let’s take an example of making the search box rounded as opposed to the square edges.
We inspect element on the search box and identify the class name.

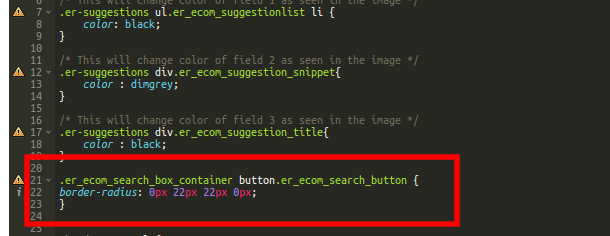
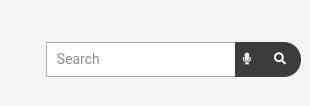
We copy the class name, add parenthesis and then add the property name and value that we want to change. In this case, since we want to make the corner rounded (only the right corners of the search button (the one with the magnifying glass) like this. Remember to add the closing parenthesis
.er_ecom_search_box_container button.er_ecom_search_button {
border-radius: 0px 22px 22px 0px;
}

After clicking on Update the search box would like like this:

To change the color of the voice icon button and the magnifying glass button you can simply change the color by either specifying it or adding the hex code.

Eg, we wish to change the color of both the buttons (voice icon and search) from black to grey. We just change the background-colour property to grey.

After clicking on Update the search box would like like this:

The above are some of the most common default CSS classes. If you want to change properties of elements whose classes are not mentioned in the default list you can find the classes from the inspect window of a browser.
The class can be identified by inspecting the element on the webpage.

If you’re using the Chrome inspector (right-click the page/search box, inspect element), highlight the line and look to the right. It should show the CSS class and any rules that are used, and a link to the CSS file.

Once we identify the class of the specific element we need to change, select it and from the styles window (the right side section in the inspect window) and either modify the existing properties or add new properties as desired.


