

Apache Solr is a very popular open-source search platform, based on the Java Lucene Library. Solr is very stable, scalable, and reliable and provides a wide set of core search functions. Solr creates an index of the available documents and then you can query Solr to return the most relevant ones for your search.
For Drupal users, it is possible to integrate your site with Solr. The Search API Solr Search module (yes, that name is a mouthful!) provides a Solr backend for the Drupal Search API module.
This tutorial will deal with the integration of the Drupal Solr platform. Before you begin, you will need to have installed Apache Solr on your server.
Create a Drupal Solr alternative search engine
Step #1. Checking the Status of the Solr Server
- Open the Terminal application in your system and type:
service solr status
- You’ll see an output with the label Active: active (exited). That means Solr is working properly. By default, Solr works on port 8983. This way, you can take a look at Solr’s user interface by typing localhost:8983 (or whatever your host is called).
Step #2. Installing the Drupal Module
To install this module, you have to use Composer, otherwise, there will be unresolved dependencies and it won’t work.
- Open your Terminal application and type:
composer require drupal/search_api_solr
Step #3. Configuring Solr
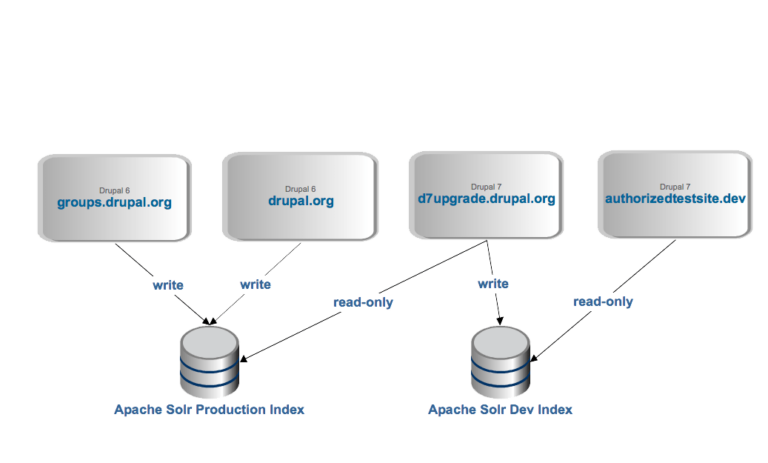
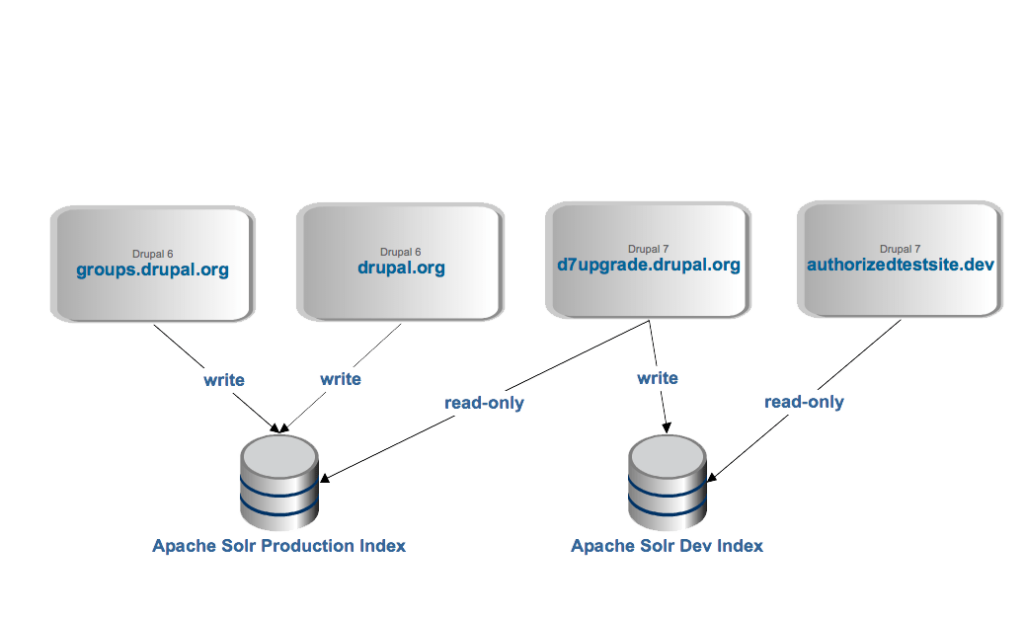
In order to work with the Solr platform, you have to create a collection. A collection is basically a logical index that’s associated with a config setting.
- Open your Terminal window and type:
sudo su - solr -c "/opt/solr/bin/solr create -c firstcollection -n data_driven_schema_configs"
- This command will vary, depending on where Solr is installed. In my case, it’s in the /opt folder of my Ubuntu system. However, the collection will be created in another directory.
- Take a look at Solr’s dashboard and select “Core Admin”.
- Check that the collection has been created and its location.
- Become the root user.
- Locate yourself in the collections folder of Solr, which is located at the /var directory in an Ubuntu-based system
cd /var/solr/data/firstcollection
- Rename the default conf file.
- Copy the configuration file called 7.x inside the installed Solr Search API module and rename it to conf.
cp -R /var/www/your_site/docroot/modules/contrib/search_api_solr/solr-conf/7.x conf
- Change owner, group and permissions for this new folder.
- Restart Solr.
- Exit session as root.
Step #4. Enabling the Search API Solr Module
- Click Extend > Uninstall and look for the Drupal default Search module. This module has to be uninstalled to avoid performance issues. Select the module and click “Uninstall”.
- Confirm the uninstall process by clicking the blue “Uninstall” button once again.
- Click the List tab and enable the “Solr Search Defaults” module, this module provides the initial default configuration.
- Click “Install”. The Solr Search module will be enabled automatically.
Step #5. Configuring the Search API
- Go to Configuration > Search API.
- The Server and Index configurations were provided by the Solr Search Defaults module.
- Click the “Edit” button to configure the Server.
The only thing you have to do is to change the name of the Solr core to the name of the core you created previously.
- Scroll down and find the Solr core label.
- Change the name of the core to firstcollection.
- Click “Save”.
The server and index are ready to use.
- Go to Extend > Uninstall.
- Look for the Solr Search Defaults module, and uninstall it. For performance reasons, the provided configuration is already stored.
Step #6. Testing the Search API Solr Module
By default, the Search API Solr module provides a view with a search box where you can type the text you’re looking for. The search page is located at:
yoursite/solr-search/content
- Type in a keyword and hit the “Search” button.
- If you see a list of results (the word has to be in the content of course) you’ve successfully configured Search API Solr. Congratulations!
Create a Drupal Solr alternative search engine
Drupal Solr Alternative
As you can see setting up Drupal Solr is not easy by any means and configuring it can get even harder as you scale. As an alternative, check out ExpertRec. It will let you create a custom search engine without any coding and control the search behavior from its control panel.
Here we will visit the steps required to add the ExpertRec Custom search engine to your website. This is one of the easiest setup processes of all the available options out there and is highly recommended.
- Navigate to https://cse.expertrec.com/newuser?platform=cse and signup with your Google ID.
- Enter your website’s URL when prompted. You can select a server location near you and add the URL of your sitemap if you wish to. These will be auto-detected otherwise.
- You can play around with the settings and customize the UI as the crawl runs. Once it is complete, you can check out a fully functional demo before taking the search to your website.
- You can take the search to your website with little to no effort. All you need to do is to paste the code snippet available on the dashboard on your website.
ExpertRec comes with more customization options that you can explore. You can read this article to find a more detailed guide on the installation and configuration.


