

Read vue-google-autocomplete v-model for more information.
Google Places Autocomplete has been a lifesaver for me many a time. It’s so powerful and easy to use! Plug it in, write half a dozen lines of code. Done. And it works so well it almost seems to read my mind. Most of the time I just need to type three or four characters and can pick the location I want.
The other day I neede to use it in a Vue app. Cool, “two-minute job”, I thought. Wrong. Googling around didn’t bring up many answers either. I did, however, find a package for the job. No offense, but come on – a package for ten lines of code? I’m more of a DIY man myself.

Scaffolding
Start with the good old vue create vue-places. This will just be a small, barebones app, so you won’t need vue-router, vuex, sass, linting or tests. Cd into the directory, run npm install open the project in your text editor. I’m sure you know the routine.
Clean out the App.vue file and type in this instead …
<template>
  <div id="app">
    <input ref="autocomplete"
        placeholder="Search"
        class="search-location"
        onfocus="value = ''"
        type="text" />
  </div>
</template>

<script>
export default {

}
</script>
… and som minimal styling. Having turned 50 I like large font size.
<style>
*, *::after, *::before {
  margin: 0;
  padding: 0;
  box-sizing: inherit;
}

body {
  background-color: #dcdde1;
  color: #2f3640;
  padding: 3rem;
}

.search-location {
  display: block;
  width: 60vw;
  margin: 0 auto;
  margin-top: 5vw;
  font-size: 20px;
  font-weight: 400;
  outline: none;
  height: 30px;
  line-height: 30px;
  text-align: center;
  border-radius: 10px;
}
</style>
Fixing the API Key
Now for the tricky part: navigating through the Google API jungle for the correct credentials. Reading this you presumably have a shortcut in your toolbar to the Google API console and know the routine, so I won’t spend about 50% of this article explaining the process. If not, just click on this link and follow the instructions.
Copy the link with the API key and paste it into index.html, just above the closing body tag.
Hooking up autocomplete
With that in place we’re at the part of the article you were waiting for: getting place to autocomplete to work.
Open the App.vue file and type this into the script section:
<script>
export default {
  mounted() {
    this.autocomplete = new google.maps.places.Autocomplete(
      (this.$refs.autocomplete),
      {types: ['geocode']}
    );
  }
}
</script>
The code snippet will make Vue aware of Google places and let the text input field react to the data from the web service. Two things are essential:
- The code must be in the mounted event. The created event will not work.
- The ref of the text input must match ref in the code.
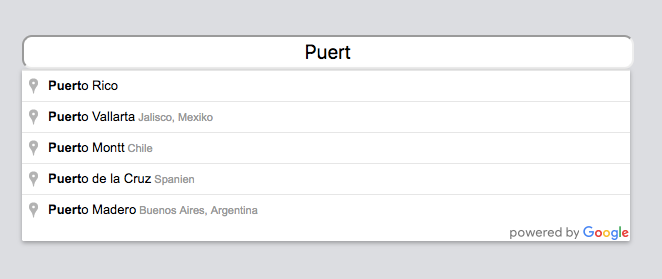
If you start the app and give it a try the autocompletion should work:
Getting the Data
That’s all well and fine, but presumably, you want to know what location the user picked. No problem. Just add an event listener to autocomplete, listening for place-changed. The event listener will fire whenever the user selects a location. To keep it simple just console.log the data. Again, the code should be in the mounted event.
this.autocomplete.addListener('place_changed', () => {
  let place = this.autocomplete.getPlace();
  let ac = place.address_components;
  let lat = place.geometry.location.lat();
  let lon = place.geometry.location.lng();
  let city = ac[0]["short_name"];

  console.log(`The user picked ${city} with the coordinates ${lat}, ${lon}`);
});
That’s all folks. I admit that it was closer to 20 than 10 lines of code, but a quick job anyway.


